

If you’ve ever glanced at your windshield and noticed a scratch, you know that little line can be way more than just an eyesore.
It can feel like your car’s face has a tiny scar, and if left untreated, scratches can grow, compromise visibility, and even affect safety features like ADAS cameras.
I’ve been working on windshields since the late 80s—back when mobile repair vans ran on noisy generators and our tools were bulky and clunky. Over the decades, I’ve repaired thousands of windshields, and I can tell you: most scratches are fixable if you act quickly and use the right approach.
In this guide, I’ll walk you through how to repair scratches on a windshield, share tips that only seasoned pros know, and explain what works, what doesn’t, and why rushing a repair can cost you more in the long run. By the time you finish reading, you’ll understand your options, how the repair process works, and how to protect your car from future damage.
Why Windshield Scratches Matter
Scratches on a windshield may seem minor, but their impact goes far beyond appearance. Even a small line can distract your attention while driving, especially in bright sunlight or at night when light reflects off the scratch. This distraction increases the risk of accidents, particularly on busy Auburn Hills roads, highways, and near shopping areas.
Scratches can also interfere with modern safety features. Many vehicles now have rain sensors, lane assist cameras, and collision detection systems integrated into the windshield area. A scratch in the wrong place can reduce sensor accuracy, trigger false alerts, or even compromise airbag deployment in a collision.
Beyond safety, scratches affect your vehicle’s resale value. A windshield marked with visible scratches looks poorly maintained, lowering your car’s perceived worth to buyers or dealerships. Furthermore, scratches are often the starting point for cracks. Dirt, moisture, or debris that seeps into a scratch can expand the damage over time.
I remember a Sterling Heights customer in 1999 who ignored a tiny scratch near the top of his windshield.
Six months later, after a spring storm, that small mark had grown into a spiderweb crack across the glass. The repair that could have cost $100 initially turned into a $300–$400 replacement—three times the expense—simply because of delayed attention. Scratches are not just cosmetic—they’re early warnings that shouldn’t be ignored.
Understanding Scratch Types
Not all scratches are the same, and recognizing their type is key to determining the correct repair method. Scratches vary in depth, location, and cause, and each presents unique challenges:
- Surface Scratches: These are light marks affecting only the outer glass layer. They are often caused by windshield wipers, dust, or small debris and can usually be polished out with the right compound. Surface scratches are the easiest to fix but still deserve prompt attention.
- Deep Scratches: These penetrate the laminated layer between glass sheets. Deep scratches may catch your fingernail and are more prone to spreading into cracks. Professional repair is recommended because improper treatment can weaken the windshield structure or cause permanent hazing.
- Star Scratches: Radiating from a single impact, star scratches often result from small rocks or debris hitting the windshield. If caught early, they are treatable, but they can quickly worsen, especially on high-speed highways.
- Edge Scratches: Found near the perimeter of the windshield, edge scratches are riskier because the stress at the edges naturally causes cracks to propagate more easily. They require careful attention to avoid total glass replacement.
Pro Tip: Run your fingernail lightly across the scratch. If it catches, the scratch is deep and likely requires professional intervention. If it feels smooth, it may be a surface-level scratch that can be polished at home. Understanding the scratch type helps prevent wasted time, effort, and money on ineffective repairs.
Tools You’ll Need for Scratch Repair
Having the proper tools is critical for effective windshield scratch repair. Using the wrong equipment or rushing the process can worsen damage, leaving micro-scratches or uneven surfaces. Over my decades of experience, I’ve learned that patience and precision outweigh speed. Essential tools include:
- Glass Polishing Compound: Specially formulated for windshields, it removes light scratches and restores clarity. Do not substitute with metal or plastic polishes.
- Cerium Oxide Powder: A gentle abrasive that polishes glass without harming the laminated layers. Mixed with water, it allows controlled, precise scratch removal.
- Polishing Pads: Soft foam or felt wheels for rotary tools ensure smooth application. Hard pads can create new scratches or uneven polishing marks.
- Microfiber Cloths: Ideal for cleaning and buffing glass. Paper towels or regular rags are too abrasive and can cause additional scratches.
- Masking Tape: Protects surrounding areas such as trim, paint, or other glass sections from polish overspray.
Pro Tip: In the early 90s, I attempted a repair with a regular metal brush in Sterling Heights. The result? More scratches and a long, costly recovery process. Proper tools prevent these errors, saving both time and money.
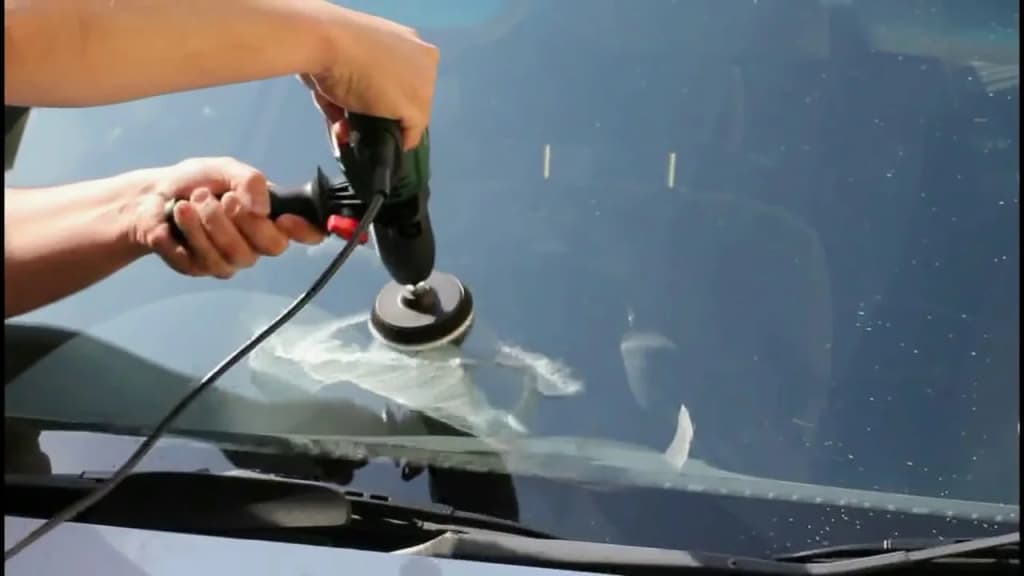
Step-by-Step Scratch Repair Process
Repairing a windshield scratch is a careful, methodical process. Whether you’re attempting a DIY repair or hiring a professional, following these steps ensures the best results:
1. Clean the Glass
Remove dirt, dust, oils, or debris before touching the scratch. Even small particles can create new scratches during polishing. Use a glass-safe cleaner and a microfiber cloth. For best results, work in a shaded area to prevent quick drying that can leave streaks.
2. Assess the Scratch Depth
Determine whether the scratch is surface-level or deep. A shallow scratch can usually be polished out, while a deep scratch may require professional tools or even partial replacement. The fingernail test works well—if your nail catches, treat it as deep.
3. Mask Surrounding Areas
Apply masking tape to protect paint, trim, or other glass sections. Polishing compounds can leave marks if they spill over, so careful masking ensures a clean repair and preserves your car’s finish.
4. Apply Polishing Compound
Use cerium oxide powder mixed with water or a pre-made glass polishing compound. Apply lightly to the scratch with soft, circular motions. Start slow, checking progress frequently. Over-polishing can leave uneven surfaces, so patience is key.
5. Buff and Clean
Once polished, remove the residue with a clean microfiber cloth. Inspect under bright light to ensure the scratch has been minimized or removed. Sometimes polishing leaves faint marks that require additional passes.
6. Repeat if Necessary
Some scratches, especially deeper or star-shaped ones, may need multiple polishing cycles. Rushing the process can worsen the damage, so repeat gently until results are satisfactory.

Common Mistakes to Avoid
Even seasoned DIYers make mistakes that can compromise the repair:
- Using harsh abrasives or sandpaper intended for metal, which can leave new micro-scratches.
- Applying too much pressure, risking micro-cracks in the glass.
- Polishing deep scratches that need professional treatment, wasting effort and time.
- Ignoring dirt and moisture before starting, which embeds particles into the scratch.
- Rushing the process, leaving uneven polish and cloudy areas.
Avoiding these mistakes is crucial to maintaining both the glass’s appearance and structural integrity.
DIY vs Professional Repair
DIY Pros:
- Lower cost for minor scratches.
- Immediate results for surface-level damage.
- Opportunity to learn a new skill and maintain your car yourself.
DIY Cons:
- Risk of making scratches worse, especially on deeper damage.
- Cannot handle cracks reaching laminated layers.
- No warranty or guarantee for repair results.
Professional Pros:
- Extensive experience with all scratch types, including deep and edge scratches.
- Proper tools, compounds, and polishing techniques.
- Ability to handle ADAS calibration if cameras or sensors are affected.
- Reliable and long-lasting results, reducing future risks.
Professional Cons:
- Higher upfront cost than DIY, but typically much less than replacing a windshield.
- May require scheduling or waiting for service, though mobile technicians reduce this inconvenience.
Weather and Curing Concerns
Weather can significantly affect scratch repair success. Moisture, rain, or snow can prevent polishing compounds from curing correctly and cause streaks or uneven surfaces. Deep scratches may require controlled conditions for proper bonding, which is often only possible in professional settings.
Acting quickly is essential. Scratches can interfere with visibility and ADAS cameras, and leaving them exposed allows dirt, moisture, or thermal stress to worsen the damage. Proper tools, patience, and step-by-step technique are essential for a durable, safe repair.
FAQS
How long does windshield scratch repair take?
For minor surface scratches, repairs typically take 30–60 minutes. These are usually shallow marks that only affect the top layer of the glass and can be polished out efficiently.
Deeper scratches, such as star or edge scratches, may require multiple polishing passes, masking, and careful buffing, which can extend the process to 1–2 hours. If professional mobile technicians are used, same-day service is often possible, minimizing downtime for busy Auburn Hills drivers.
The key is patience—rushing the process can leave streaks, uneven polish, or worsen the scratch. Always allow sufficient time for each step, including cleaning, polishing, and buffing.
Is OEM glass worth it for repair?
Yes. Using OEM or OEM-equivalent glass ensures the windshield maintains its structural integrity, proper fit, and clarity. This is particularly important for modern vehicles with ADAS cameras and sensors, as aftermarket glass may misalign these systems, trigger warning lights, or even fail inspection tests.
OEM glass also tends to last longer, resists scratches better, and blends seamlessly with your vehicle’s design. In Auburn Hills, where road debris and extreme seasonal temperatures are common, OEM glass provides better long-term durability and safety compared to cheaper aftermarket alternatives.
Can rain affect the repair?
Absolutely. Moisture is one of the biggest enemies of windshield scratch repair. Rain or even high humidity can interfere with the curing of polishing compounds or cerium oxide, leaving streaks or reducing the effectiveness of the repair.
Dirt or dust that mixes with water can further scratch the glass while polishing. For best results, repairs should be performed in dry, shaded, or covered areas, preferably indoors or with a mobile technician using a controlled environment. Delaying repair due to weather is better than rushing it in wet conditions, which may worsen the scratch and require additional work.
Do I need ADAS recalibration?
ADAS recalibration is necessary only if the scratch affects cameras or sensors mounted on or near the windshield. Features like lane assist, collision warning, adaptive cruise, and rain-sensing wipers rely on precise alignment.
Even a small scratch in the sensor zone can trigger false alerts or cause system errors. Minor surface scratches away from the camera’s field typically do not require recalibration. Auburn Hills drivers should always consult a professional if the scratch is near ADAS components, as misalignment can compromise safety and may lead to costly dealership fixes if ignored.
Will insurance cover it?
For minor scratches, insurance usually does not cover repairs, since they are considered wear and tear. Coverage typically applies only if the scratch results from hail, vandalism, or another covered event. Reporting damage promptly and documenting it with photos increases the chance of a claim being accepted.
Many Auburn Hills drivers underestimate the value of early reporting—small scratches can escalate to cracks, which insurance often does cover. Always check your policy, and use a certified technician to ensure repairs are performed correctly for maximum coverage eligibility.
How do I stop scratches from spreading?
Preventing scratches from worsening requires a mix of cleaning, careful driving, and prompt attention. Keep your windshield free of dirt and debris, as particles can work their way into existing scratches.
Avoid abrasive cleaning tools, harsh chemicals, or rough cloths that can enlarge the damage. Parking in shaded areas or covered garages protects the glass from thermal stress that can cause scratches to deepen. Finally, address scratches early with DIY polishing for surface marks or professional intervention for deeper scratches—delaying repairs is the fastest way for minor scratches to turn into costly cracks.
Conclusion
Windshield scratches may seem minor at first glance, but they can quickly escalate into serious safety hazards or costly repairs if ignored. From reducing visibility to interfering with ADAS cameras and sensors, even small scratches can compromise your vehicle’s performance and safety features. Acting promptly—whether through careful DIY methods for surface scratches or professional repair for deeper or sensor-area damage—can save you time, money, and stress in the long run.
Using the right tools, quality materials like OEM glass, and following proper techniques ensures a long-lasting repair that preserves structural integrity and keeps all advanced safety systems