I’ve been in the auto glass industry for over 30 years. From hand-waxing classic cars in the 90s to replacing windshields on Teslas with complex ADAS systems today, I’ve seen every type of windshield and every kind of driver reaction. One thing I’ve noticed over the decades is that many people underestimate what actually happens during a windshield replacement.
A windshield replacement isn’t just pulling out old glass and popping in new glass. There’s a lot of precision, preparation, and care involved.
Modern vehicles, with their advanced sensors, cameras, and driver-assist systems, add extra layers of complexity. Even a small misstep can cause leaks, cracks, or misalignment of safety systems.
In this article, I’m going to take you behind the scenes and walk through the top 10 things that happen during a windshield replacement. I’ll share insider tips, mini-stories from real jobs, and practical advice so that next time your windshield needs attention, you know exactly what to expect.
Why Understanding the Process Matters
Most drivers see windshield replacement as a simple service: “Swap old glass for new, right?” But the truth is, every step is crucial for safety, longevity, and system functionality.
Improper installation can lead to leaks, cracks spreading faster than usual, and in modern vehicles, misaligned cameras and sensors.
I’ve repaired countless windshields that were “technically replaced” but had misaligned ADAS systems, forcing expensive recalibrations. Knowing what happens during a replacement gives you confidence in the process and helps you ask the right questions.
Preparation Before the Replacement
Before the glass even moves, the technician prepares the vehicle. This step includes inspecting the windshield area, checking for damage around the frame, and ensuring the proper replacement glass is ready.
I remember a time when a customer brought in a 2018 SUV. On inspection, I noticed slight rust around the windshield frame. We treated the rust and reinforced the area before installing the new glass.
Preparation also involves removing interior panels, rearview mirrors, and any attachments on the windshield. Skipping these steps may cause misalignment or scratches on the dashboard and trim.
Safety Precautions and Tools
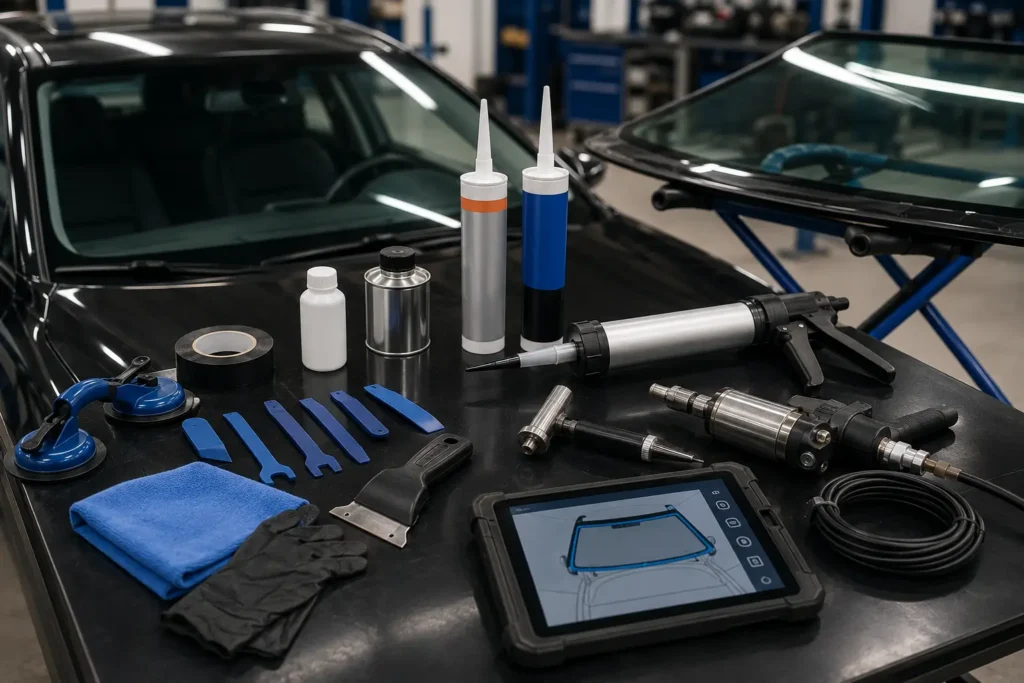
Windshield replacement requires specialized tools. From cutting knives and suction cups to high-strength adhesives and curing equipment, every tool has a purpose.
Safety is paramount. I always wear gloves and eye protection, even after three decades. The glass edges are sharp, and the adhesive chemicals can be irritating.
Proper safety also includes keeping the vehicle stable, ensuring no interior parts shift during the replacement, and maintaining a clean workspace.
How Modern Windshields Are Integrated Into Vehicle Systems
Modern windshields are no longer just pieces of glass—they are structural and electronic components of the vehicle. They support roof strength, assist airbag deployment, and act as mounting points for ADAS cameras and sensors.
Even a slight misalignment can affect lane assist, emergency braking, or adaptive cruise control.
Because of this integration, windshield replacement has become a precision task rather than a basic repair job.
Manufacturers now require strict alignment and calibration procedures after installation to ensure all systems function correctly.
Tools, Materials, and Technology Used During Replacement
Every windshield replacement relies on specialized materials and tools designed for precision and safety. Technicians use urethane adhesives, primers, suction lifters, cutting wires, and UV curing lamps to complete the process.
Each material plays a critical role in ensuring the glass bonds properly to the vehicle frame. Even the adhesive type can affect long-term durability and crash safety.
Modern tools also help technicians avoid scratches, leaks, and misalignment issues.
Without the right equipment, even a small mistake can compromise the entire installation.
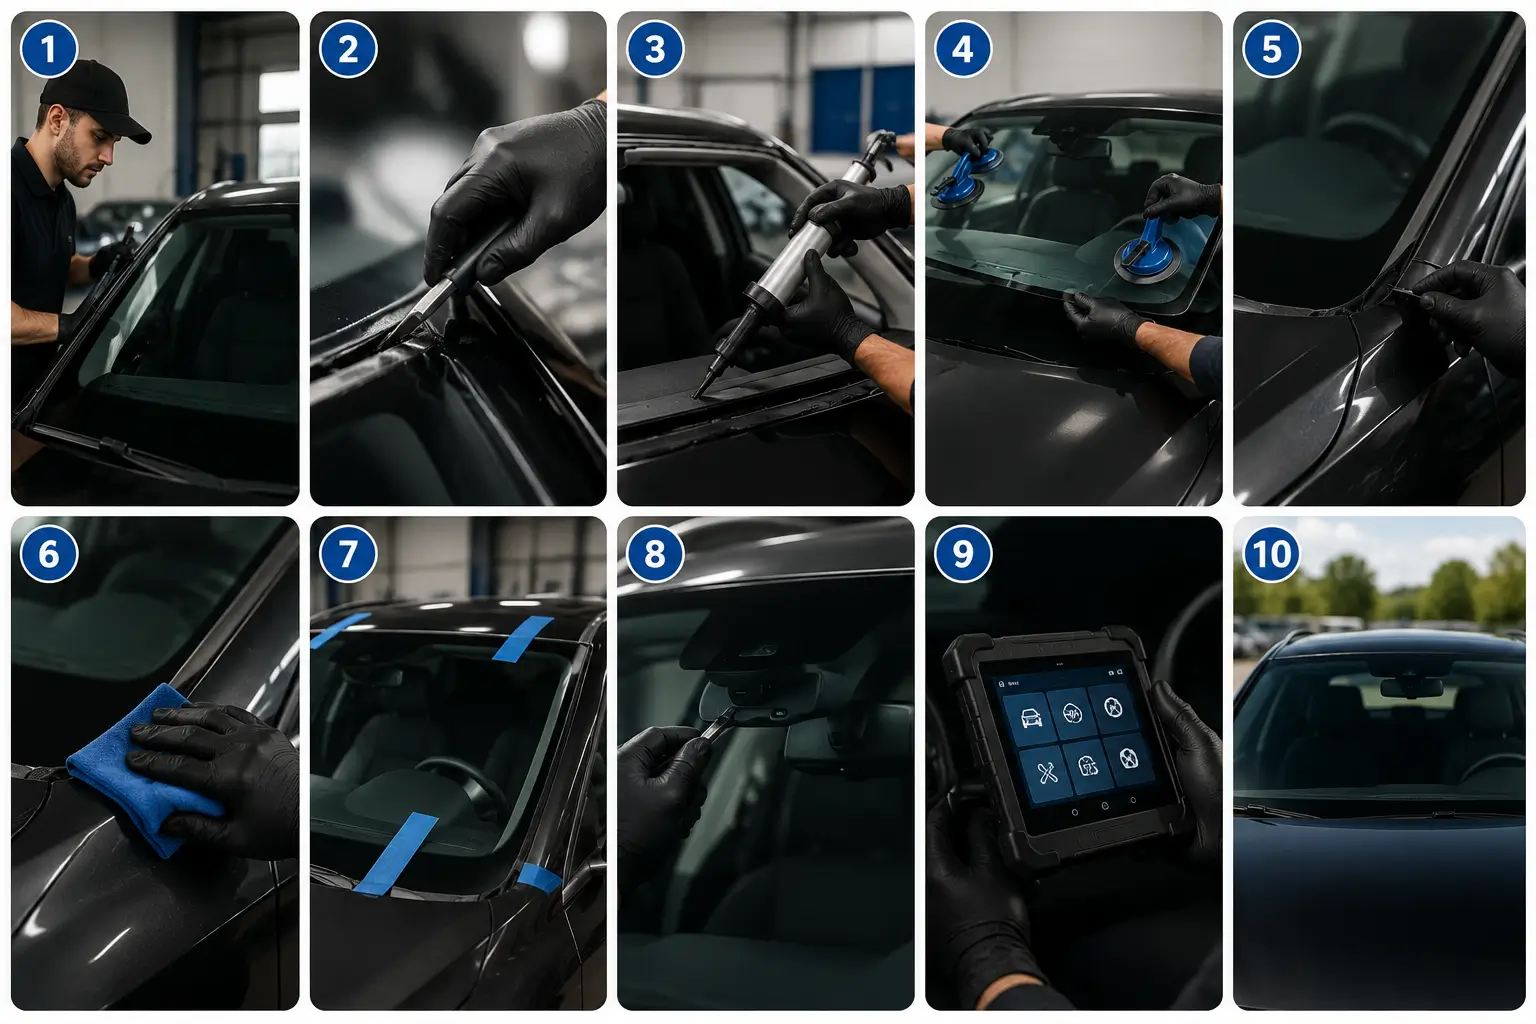
Top 10 Things That Happen During a Windshield Replacement
Before we dive into the details of the top 10 steps, it’s important to note that while some shops complete replacements in under an hour, thorough installations often take several hours. Modern vehicles with ADAS require additional calibration time.
1. Removing the Old Windshield
Removing a windshield isn’t just “pulling it out.” Technicians carefully cut through the adhesive and remove the glass without damaging the vehicle frame or trim.
Adhesive cutting
We use specialized knives or power tools to cut through the urethane holding the windshield. I’ve seen inexperienced shops rush this step, leading to chipped paint or bent frames.
Handling glass safely
Once loose, the old windshield is lifted out using suction cups. I recall a story where a co-worker accidentally dropped a windshield, shattering it completely. That’s why proper handling is critical.
Disposal
Old windshields are carefully disposed of or recycled. Some shops even salvage usable glass layers for repair training or small craft projects.
2. Cleaning the Pinch Weld
The pinch weld is the metal frame around the windshield. Cleaning and prepping this area is crucial for a strong bond.
Rust and debris removal
Over decades, I’ve seen pinch welds with rust, old adhesive, or paint overspray. We remove all contaminants to prevent leaks and ensure adhesive adhesion.
Surface priming
Some vehicles require a primer or activator to enhance bonding. Skipping this step can compromise the replacement, leading to cracks or leaks in a matter of months.
Attention to detail
A clean, smooth pinch weld ensures the new windshield sits flush and aligns correctly with vehicle trim. This also helps prevent wind noise, water intrusion, and sensor misalignment.
3. Preparing the New Windshield
Not all replacement glass is created equal. OEM glass differs from aftermarket options in fit, clarity, and durability.
Verification
We inspect the glass for scratches, chips, and proper curvature before installation. A minor flaw can create stress points that turn into cracks.
Sensor integration
Modern windshields often house ADAS cameras or rain sensors. We ensure all mounting points, notches, and sensor areas are properly prepared before installation.
Handling
Glass is fragile. Even a slight bump or pressure can cause microfractures that appear later. Proper storage and handling are essential.
4. Applying Urethane Adhesive
The adhesive is what bonds the windshield to your vehicle. Modern urethane adhesives are incredibly strong but require precision in application.
Consistent bead
Technicians apply a consistent bead along the pinch weld. Too thin, and the bond may fail; too thick, and the glass might not seat properly.
Curing time
Adhesive requires proper curing before the vehicle is driven. I always tell customers, “Give it at least an hour before hitting bumps or washing the car.” Some adhesives need several hours to achieve full strength.
Temperature and humidity
Environmental factors affect curing. Extreme cold or heat can slow the process or cause bubbles. Experienced technicians adjust methods to account for weather conditions.
5. Placing the Windshield
After adhesive application, the windshield is carefully positioned and pressed into place.
Alignment
Even a millimeter off can affect trim, wipers, or sensors. I remember replacing a windshield on a high-end sedan; misalignment by just 2 mm caused rain to leak directly into the dashboard vent.
Pressure and seating
We apply pressure evenly along the edges to ensure the adhesive contacts the entire pinch weld. This prevents gaps that could lead to leaks or wind noise.
Double-checking sensors
For vehicles with ADAS, cameras and sensors must be checked for proper alignment before the adhesive fully cures.
6. Reinstalling Trim and Accessories
Once the glass is in place, we reinstall the interior and exterior trim, mirrors, and other components.
Avoiding scratches
Removing and reinstalling trim must be done carefully to avoid damaging the dashboard or A-pillars.
Functional checks
We test wipers, defrosters, and rain sensors to ensure everything works perfectly. Any misalignment is corrected immediately.
Customer peace of mind
I always walk clients through this step, showing that everything fits flush and functions as expected.
7. Cleaning the Glass and Vehicle
Cleaning is more than aesthetics—it helps identify microchips or installation issues.
Interior and exterior
Technicians remove adhesive smudges from both sides and polish the windshield for clarity.
Inspection
This step lets us double-check for air bubbles, cracks, or sensor misalignment before the vehicle leaves the shop.
Final quality check
A spotless, properly installed windshield ensures customer satisfaction and safety.
8. Post-Installation Curing
Adhesive curing is critical. Even if the windshield appears secure, it takes time to reach full bond strength.
Waiting periods
Most adhesives need at least 24 hours for full curing. Driving on rough roads too soon can compromise the bond.
Environmental considerations
Extreme temperatures or moisture can affect curing, which is why we advise customers on optimal post-installation conditions.
Safety first
A properly cured windshield can withstand airbags deployment, roof crush forces, and everyday driving stress.
9. ADAS Calibration
Many modern vehicles require Advanced Driver Assistance Systems recalibration after a windshield replacement.
Why calibration is essential
Lane departure, collision warning, and adaptive cruise systems rely on accurate sensor placement. A misaligned windshield can render them ineffective.
Calibration methods
Some vehicles use static calibration in the shop, others require a short test drive. Either way, it must be done professionally.
Cost and timing
Calibration may add to the total replacement time and cost, but skipping it risks safety and liability. I’ve recalibrated dozens of cameras that would have otherwise triggered false warnings or failed entirely.
10. Final Inspection and Customer Handoff
The last step is a thorough inspection and handoff to the customer.
Demonstrating work
I walk the client through the windshield, showing trim alignment, sensor functionality, and clarity.
Instructions
Customers receive guidance on waiting periods, washing, and driving gently for the first 24 hours.
Documentation
Proper documentation ensures warranty coverage for both labor and materials, giving peace of mind.
FAQ Section
Q1: How long does a windshield replacement usually take?
Depending on the vehicle, complexity, and ADAS systems, a full replacement can take anywhere from 1.5 to 4 hours. This includes removing the old windshield, preparing the frame, installing the new glass, and adhesive curing.
For vehicles with ADAS calibration, you may need an additional hour for testing and sensor alignment. Rushing any step risks leaks, misalignment, or sensor errors, so patience is key.
Q2: Can I drive immediately after a replacement?
Not always. While some adhesives allow light driving after an hour, full bond strength usually requires 24 hours.
Driving over bumps, washing the car, or applying pressure too soon can compromise the adhesive and potentially cause leaks or misalignment. Always follow technician instructions for best results.
Q3: Are all replacement windshields the same?
No. OEM glass matches original specifications, including curvature, thickness, and sensor mounting. Aftermarket glass may differ in fit and quality.
Using the correct glass ensures proper alignment, sensor function, and durability. I’ve seen aftermarket glass fit well initially but fail prematurely due to subtle differences in thickness or adhesive compatibility.
Q4: Why is ADAS calibration necessary?
Lane departure, collision avoidance, and adaptive cruise systems rely on precise camera and sensor placement.
A new windshield shifts these sensors slightly, so calibration ensures accurate readings. Without calibration, warnings may trigger falsely, or safety systems may fail when needed most.
Q5: How do I know if my windshield was installed properly?
Check for leaks, wind noise, and sensor alignment. Inspect trim, wipers, and the adhesive bead for consistency.
A professional shop will also demonstrate functionality and provide post-installation guidance. Early detection of any issues prevents costly repairs or recalibration later.
Conclusion
A windshield replacement is far more than a simple glass swap. From preparation and old glass removal to adhesive application, sensor calibration, and post-installation inspection, every step is critical for safety and performance.
I’ve seen windshields fail prematurely when corners were cut or steps skipped, and I’ve also seen vehicles perform perfectly for years when every detail was handled carefully.
Understanding the process gives you confidence when choosing a shop, asking questions, and caring for your vehicle afterward. Remember, your windshield protects you, your passengers, and your ADAS systems—it deserves attention and care.
Driving isn’t just about steering; it’s about anticipating hazards, protecting your vehicle, and trusting that the professionals handling your glass know every step to keep you safe. Next time your windshield needs replacement, you’ll know exactly what happens behind the scenes and why every step matters.